How to Create an Ecommerce Website Using Magento 2
The growth of ecommerce is nothing but extraordinary in recent years as more and more people are buying online. There are various platforms available that offer a ready-made solution for developing and deploying an ecommerce website in minutes.
Share


Are you an entrepreneur?
…and you want to start a Magento website for your eCommerce business.
If so, You made the right decision!
Magento is the most preferred choice among developers and enterprise clients for creating ecommerce sites. Magento is an open-source ecommerce platform developed using PHP and was acquired by Adobe Inc in May 2018.
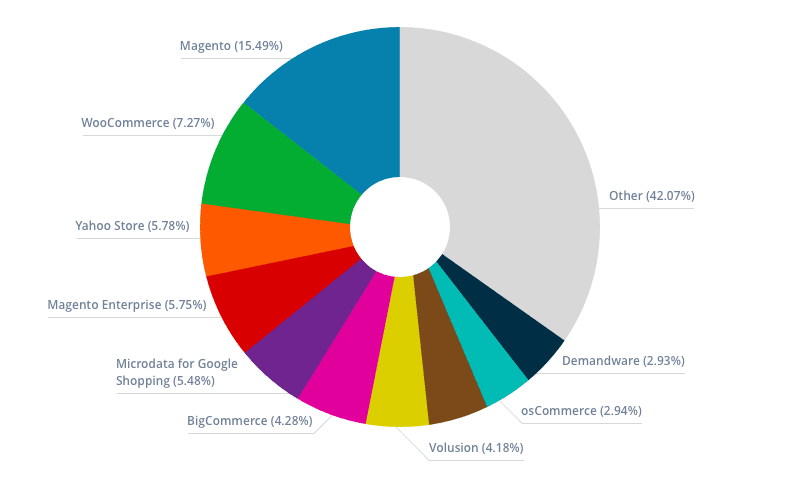
How Magento 2.0 rank among its peers?

Key benefits of Magento 2.0
1. Unlike WordPress, Magento is a CMS developed for a single purpose: ecommerce and hence offers a wide variety of toolsets for fulfilling business needs.
2. Magento 2.0 is supported by 1000s of third-party extensions and themes which makes development easier.
3. With a single install of Magento 2.0, one can create multiple websites and stores.
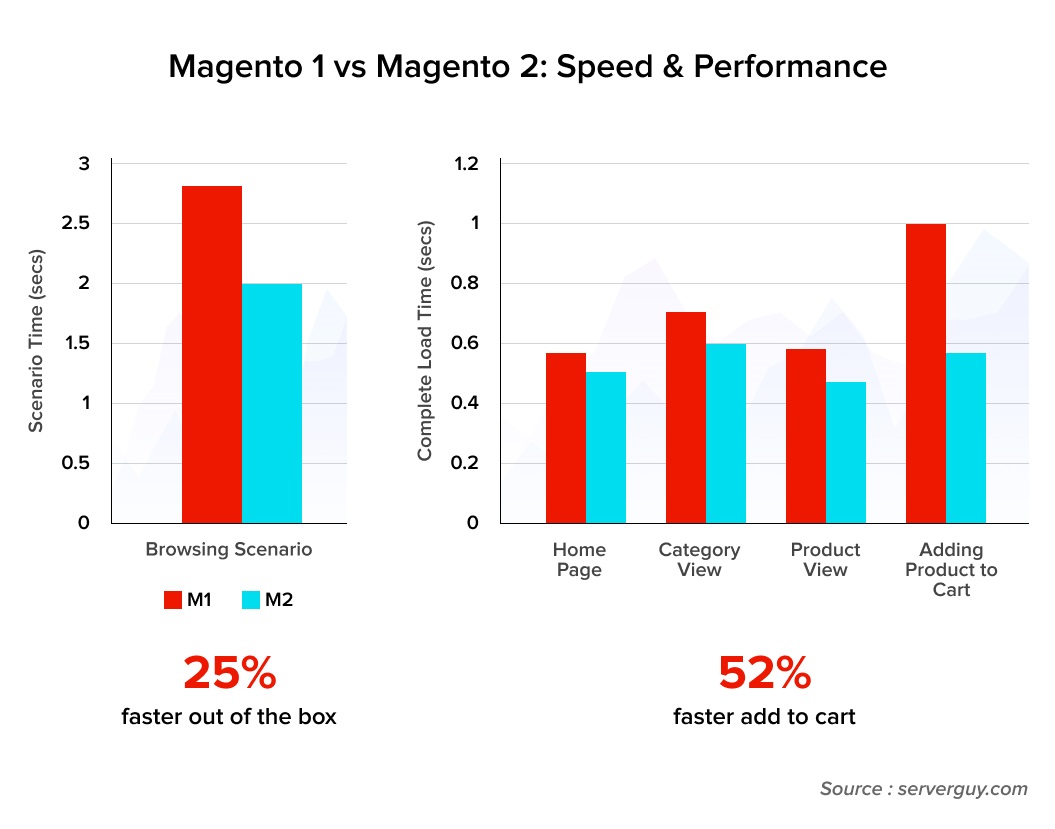
4. Magento 2.0 is highly optimized for performance compared to its peers thus offering a fast and smooth user experience.
5. All the readymade ecommerce solutions have security issues, but Magento 2.0 seems to be the more secure option available.
6. Magento 2.0 is highly optimized for SEO and helps in getting organic traffic from search engines.
Steps to create ecommerce sites with Magento 2.0
Plans and pricing
Magento 2.0 offers a free open-source version and also paid versions with cloud installs. It is possible to create a full-fledged ecommerce portal with the free version and other options are Magento commerce and Magento Commerce cloud which is hosted with AWS. There is no fixed pricing for Magento and it depends on your annual sales revenue.
Step 1: Review Magento 2.0 Stack and hosting requirements
Choosing the right hosting provider for a Magento 2.0 installation is an important factor that determines the performance. Before looking at the hosting providers, it is important to understand the prerequisites for Magento 2.0.
1. Magento can be installed on any machine running a Linux operating system with RedHat or Ubuntu.
2. Web server can be either Apache or Nginx.
3. For optimal performance, Magento 2.0 requires a minimum of 2 GB RAM.
4. Magento 2.0 is compatible with the latest versions of MySQL databases.
5. Magento 2.0 and higher versions are compatible with PHP 7.0 and above versions.
6. Starting from Magento 2.4, Elasticsearch is mandatory for configuring the catalog.
There are multiple hosting providers that offer specialized hosting solutions dedicated to Magento sites. Some of the popular choices are Cloudways, Bluehost, etc.
Step 2: Download and install Magento 2
Once you’ve purchased suitable hosting for the Magento website, the next step is to install the latest version of Magento. Most of the hosting providers offer a simple one-click install for installing and setting up Magento within minutes.

The recommended method of installing a Magento 2.0 is by downloading their latest stable version at https://magento.com/tech-resources/download
Install the preferred Magento version using Composer to avoid any compatibility issues with PHP.
You can also install Magento by cloning their GitHub repo but it’s not suitable for the production environment.
Step 3: Complete General Configuration
It is highly recommended that you register your Magento install by creating a free account on the Magento website. After registration, go to Magento marketplace and create access keys under your account. These access keys are required for configuring themes and extensions. Once you’re logged into your Magento install, the first thing to do is set up the store and customize it.
Go to Stores-> Settings->Configuration-> General from the admin sidebar. Here you can add all basic details like Store name, country, address, currency, etc.

Step 4: Select a Theme
Magento 2.0 comes with a default theme pre-installed. Magento marketplace offers a wide array of both free and paid themes. After creating the access keys, you can surf the themes and add them to your cart.
Now switch to your Magento install and go to Settings->Web Setup Wizard->Extension Manager.
It will prompt you to enter the access keys that you created earlier. Once the access keys are entered, it will display all the themes that you’ve selected from the marketplace. You can select the theme that you want to start with and click on the install button.
Theme will be installed along with a compatibility check. Additionally, you can also purchase a Magento theme from other marketplaces like Themeforest, etc.
Step 5: Customizing the Theme
Once the theme is successfully installed and is fully compatible, the next step is to customize the theme to suit your business. This includes uploading your business logo, selecting the color palette, typography, etc.
You can also add widgets that will be automatically included in all pages of your Magento store. There is also the option of designing a Magento theme from scratch but it requires technical skills.
Step 6: Extensions
Magento marketplace offers a huge number of extensions across verticals to easily add new functionalities to your Magento store. You can search or filter the extensions in the marketplace and add them to your cart similar to what you did with themes.
There are many free and paid extensions to add important functionalities like payment gateway, shipping logic, analytics, security, etc.
Step 7: Configure Catalog (Add products)
Now that your Magento store is fully setup, it’s time to add the core component: your products that you would like to sell online.
Go to Catalog->Products->Add Product to add your products and categorize them accordingly.
Magento 2.0 supports many product types like simple, grouped, virtual, bundle, downloadable products, etc.
Step 8: Set up payment and shipping methods
By default, Magento 2.0 supports Paypal gateway and you can add more gateways using the extensions.
The shipping methods configuration is placed under the Store > Setting > Configuration > Sales > Delivery Methods. You will finish all settings for shipping options that you want to enable on your Magento 2 store. You can also set up to allow multiple shipping addresses and define maximum product quantity for multiple shipping addresses.

Configure the payment gateway of your choice by going to settings panel. Once the payment gateway is setup, install an extension for shipping methods and configure the same.

Preview and go live
Once everything is set up, check compatibility issues between themes and extensions and also preview and test the site thoroughly before publishing it to the web. Add your custom domain and go live.
The Bottom Line
Magento is one of the most popular and powerful ecommerce platforms that empowers you to start an online business. Are you ready to start your own eCommerce website?
Starting an eCommerce website using Magento doesn’t have to be overwhelming. Especially not with our guide. Let’s begin to build a Magento eCommerce site to grow your own business.
We’re just a click away to provide you with a free consultation on how to set up your eCommerce business. Contact us Today

Share